Skills:Opening
a photo, saving a photo, selecting and deselecting, feathering,
making a vignette.
Opening
a photo: On the Menu Bar left click <click> on File, Open <click>, and then choose
the location of your file in the Look in: field. Once in the proper folder, click
on the image you wish to edit, Open <click>.

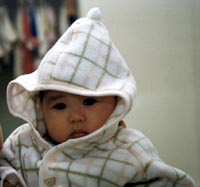
Practice: Open a photo at school ¨On the Menu
Bar left click <click> on File, Open
<click>, Scanner on Cot S: <click>, Samples <click>,
People<click>, Baby , Open <click>.
Using
the Marquee Tool: One of the key skills in working
with digital images, is being able to select the area you want
to modify. The first six tools on the tool box are all selection
tools. 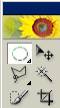
Marquee - selects a rectangular, square, elliptical, or
circle.
Move moves a selected area.
Lasso- selects a polygon or freehand selection area.
Magic wand- selects areas based on color matching
Selection brush selects only the areas you pass over
with the brush.
Crop tool-
trims your image. The area inside the selection is kept the rest
is deleted.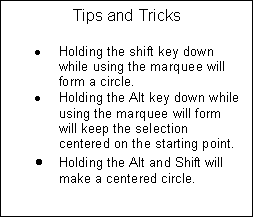
- Click on
the Marquee tool in the upper left hand corner of the
tool box. If you hold down the mouse you will notice two hidden
tools will appear the rectangle marquee and the elliptical marquee.
Also when you click on the tool, the options bar will change
to reflect the options of the selected tool.
- On the
Options Bar click on the Elliptical Marquee option.
- Set the
Feather option to 20 pixels. (The larger the number the
wider the faded or feather edge of your vignette will be. This
is also affected by the resolution of the orginal picture.
Pictures with higher resolutions will require a larger number
to obtain the same feather effect.
- Left click
on the picture and drag to form an ellipse. Click and drag in
the center of the ellipse to reposition it.
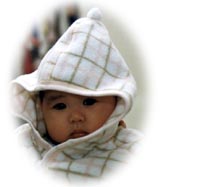
Making
the Vignette:
After you
have selected the area of the picture you want to keep for your
vignette, click on the Effects tab in the palette well. Double
click on the Vignette effect.
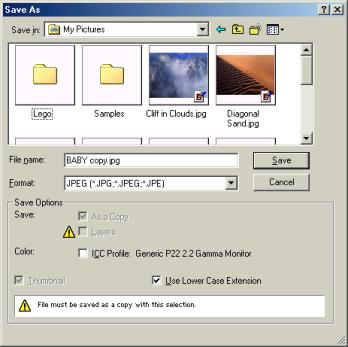
Saving
the Image:
On the Menu
Bar, File <click>, Save As <click>, find the
folder location you want to save the picture to such as My
Documents or My Pictures, under File Name, give the
file a name (eg. Baby Vignette, or Baby copy), change the Format
to JPEG.
Printing
the Vignette:
1. Printing
multiple wallet sized prints: On the Menu Bar, click on File,
Print Layouts <click>, Picture Packages <click>.
Under layout choose the picture package you would like to
print. (9) 2.5 X 3.25, Click the OK button.
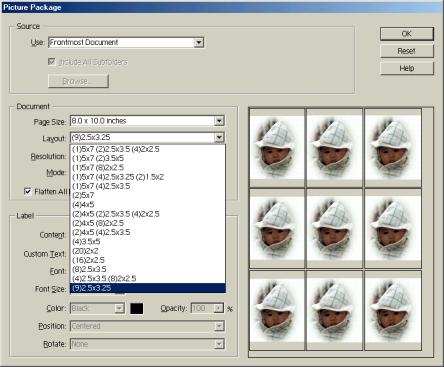
2. The photo
package is actually another image by itself. If you plan to print
this package again save the image package.
3. To print
the image package, on the menu bar, File <click>, Print
<click>, OK<click>.
Next>>>>Hand
Tinting a Black and White Photo